TECHNICAL SUPPORT
Installation & Maintenance.
Because the purchase of New Terracotta Tile for your home or commercial project represents an important investment, proper installation and maintenance is critical.
GLAZED TILES
New Terracotta Tile Collection is suitable for most interior and exterior applications, including residential and commercial floors, walls, counters, showers, bathrooms, swimming pools, spas and fountains.
TILE UNDERSTANDING
It is important to understand that the differences in colour, shape, size, texture and moisture absorption are the unique characteristics that distinguish each of these tile products.
Glazed Tile
A coloured, liquid glaze is applied to the surface of a clay body.
The tile is fired in a kiln at very high temperatures of more than 1.050 ºC .
The glazing process defines the colour and surface texture and produces a hard, non-porous, impermeable tile with a very low water absorption rate.
Glazed tiles are easier to clean and any liquid on its surface will drain faster.
Size and Length Variation
Our tiles shrink during the production process.
You can expect some variation, especially on longer tiles.
Lengthwise Bowing and Surface Undulation
Clay is an elastic material; therefore it will attempt to regain its original shape as it moves through the production process. For this reason, you can expect both an acceptable amount of lengthwise bowing and a surface undulation.
Undulation can occur anywhere on the surface and could include a slightly raised corner or edge.
Colour and Glaze Variation
Shade variation is inherent in all fired ceramic products and certain tiles will show greater variation within their dye lots.
We assign all our glazes with a low, moderate, high or very high rating. See our Glaze Guide for a complete description of glaze characteristics.
Glazing on relief tiles will vary in thickness and as a result the glazing may appear darker and lighter in different areas throughout the tile.
TILE PREPARATION
Meticulously plan your layout. The time you take for preparation and placement will greatly impact the finished result.
- Pre-sort your tile by colour and size so you can distribute the range of variation throughout the installation.
- Blending is recommended.
- Inspect each tile for cracks or other deformities that make its use inappropriate for the application intended.
TILE GROUTING
We advise a grout joint (1 to 4 mm) which joins the tiles so that they touch one another with an irregular space left between tiles, created by the imperfection of the edges.
Grout joint width can be varied to adjust tile alignment with adjacent handmade tiles or other architectural elements.
Give design consideration to the grout colour as relates to the colour of tile chosen. There may be a desire to accentuate the tile with a border of contrasting grout colour. To more closely connect each tile with each other, use a grout colour in a hue that approximates the colours found in the tile.
TILE INSTALLATION
Install per industry standards for terracotta glazed tiles.
Proper substrate preparation and the right choice of adhesives and grouts for the type of tile and specific project conditions are critical for achieving a long-lasting installation. New Terracotta tiles can be installed with any conventional tiling method, using any mortars, adhesives (EN 1200 C2) and grout compounds (EN 13888) suitable for use with wall tiles.
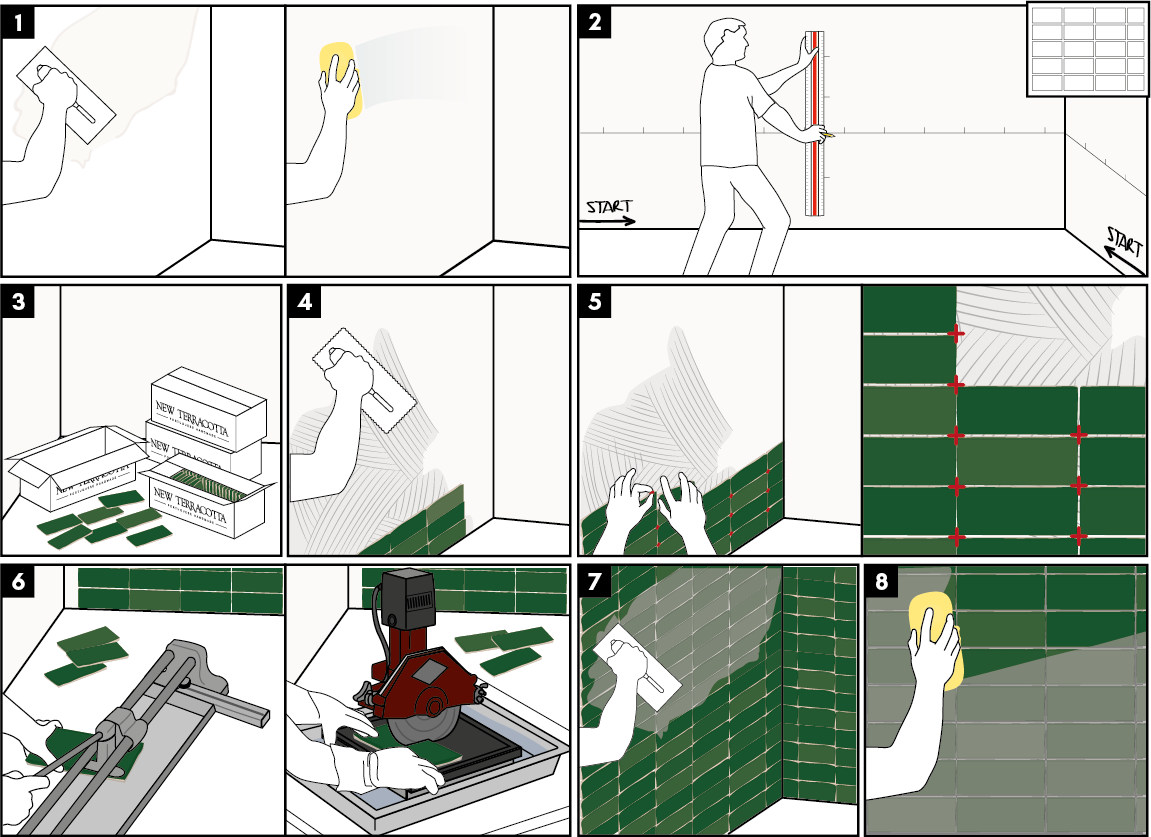
 1.Prepare the surface. Substrate must be clean, leveled and adequately set.
2. Determine the layout and mark the surface. For aesthetic and technical optimization, define starting points and cuttings.
3. Distribute the tiles. Pre-sort your tile by colour and size so you can distribute the range of variation throughout the installation.
4. Apply the proper tile adhesive. Use a large-toothed trowel to spread the adhesive.
5. Install the tiles. Lay down tiles by lining them up and pressing them firmly into the adhesive. Installation is easier if you use X-shaped tile spacers.
6. Cut the tiles. If some tiles need to be trimmed, you can use either a snap tile cutter or a wet tile saw.
7. Grout the joints. Allow the adhesive to cure for about 24 hours and then fill in the joints with the selected grout, using a rubber grout float.
8. Clean the tiles after grouting. The excess grout must be cleaned immediately with a wet sponge, rinsing often.
MAINTENANCE
New Terracotta Tile is a relatively maintenance-free product that requires little continuing care beyond regular cleaning.
Continued beauty and performance of our tiles is assured by following these recommendations:
- For everyday cleaning, simply use a pH-balanced natural cleaner diluted in warm water.
- To clean stubborn spots or grout joins use a stiff natural bristle brush.
- Always avoid the use of abrasive cleaning pads or products containing bleach, ammonia and paint thinner.
- Never scrub with rough materials, such as hard brushes or wire wool, which may scratch the surface.
- In cooking areas, around a stove, on counters and backsplashes, cooking oil splatters should be cleaned as soon as possible as oil may darken some tiles.
COTTO TILES
Please note these tips are guides only and should be used in addition to the relevant industry standards for cotto tiles. Note that installation may vary from site to site with varying conditions experienced on site (i.e. soil conditions, pool surrounds, driveways, wet areas etc.). The contractor and specifier should decide if these suggestions are suitable for their application or require further adjustment.
TILE UNDERSTANDING
Size and Length Variation
Our tiles shrink during the production process.
You can expect some variation, especially on longer tiles.
Lengthwise Bowing and Surface Undulation
Clay is an elastic material; therefore it will attempt to regain its original shape as it moves through the production process. For this reason, you can expect both an acceptable amount of lengthwise bowing and a surface undulation.
Undulation can occur anywhere on the surface and could include a slightly raised corner or edge.
Shade Variation
Shade variation is inherent in all fired ceramic products and certain tiles will show greater variation within their fired lots.
Efflorescence
The term efflorescence means the migration of salts to the surface of the cotto tiles.
Efflorescence originates from the terracotta itself, from the ground, concrete, polluted rain or by poorly executed acid washes.
Since the clay we use is 100 % natural, different efflorescence is likely to appear after the laying process.
In order to remove efflorescence, possible remains of sand and stucco smears, a floor washing is needed before any kind of floor treatment. The washing is made through a specific buffered acid followed by a rinse with clean water.
TILE PREPARATION
Meticulously plan your layout. The time you take for preparation and placement will greatly impact the finished result.
- Pre-sort your tile by shade and size so you can distribute the range of variation throughout the installation.
- Blending is recommended.
- Inspect each tile deformities that make its use inappropriate for the application intended.
- Both sides of the tiles should be wiped cleaned of any dust before installation.
- The tiles can be cut using a diamond-blade (ideally a water–cooled machine).
TILE LAYING
The laying of New Terracotta Cotto can be carried out with many patterns also by mixing different formats, using a mixture of sand and cement screed, dusted with wet cement or by using adhesive, a more reliable and simple method. The most recent developments in technology in the field of adhesives offer biocompatible materials, excellent for combining with our organic products.
Slope – Laying Outdoors
For laying outdoors we recommend to keep the correct slope to prevent water stagnation.
When dealing with outdoor flooring, special attention must be paid during planning in order to respond adequately to rainwater run-off. This is done by dividing the floor field into different drainage surfaces, giving them effective slope and perfect levelness.
This will avoid trapping water and moisture on the floor surface since they cause undesirable and unsightly effects due to rings, saltpetre efflorescence and dirt build up. Laying General Methods:
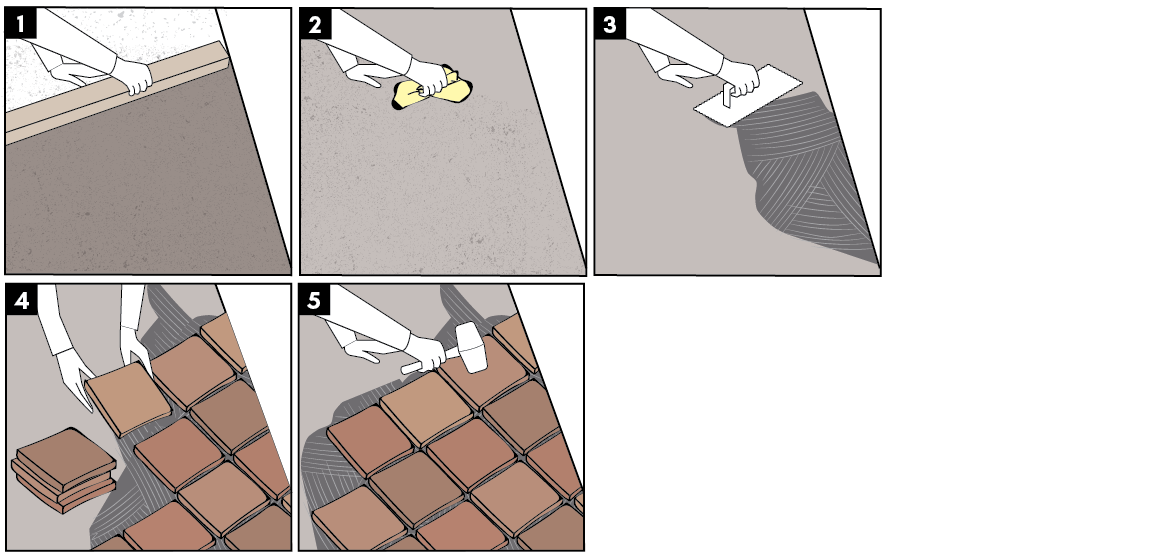
1. Prepare a sub floor (screed) that is perfectly flat to make it easy to keep the cotto tiles leveled with each other (therefore offering the necessary laying tolerances).
2. Clean the laying surface (remove debris, dust oil, etc), once the screed is completely dry.
3. Prepare a uniform layer of adhesive (8 to 10 mm thick) using a notch trowel and back butter the base of the tile as well.
4. Lay the cotto tiles so the timing corresponds to the drying time required for the adhesive used.
5. Compact the cotto tiles evenly on the adhesive with a rubber mallet to ensure consistent contact. Consistent open joints should be allowed for at 4 to 6 mm spacing.
TILE SURFACE PREPARATION BEFORE SEALING AND GROUTING
Once the adhesive dry, clean the surface by scrubbing it using a neutral detergent diluted with water. It will remove any dust and dirt that may have accumulated during the installation process.
Rinse thoroughly with clean water and leave to dry.
Tiles should then be allowed to set for 48 hours before applying sealant and grout.
TILE SEALING BEFORE GROUTING
An impregnating sealing is an essential step in protecting the beauty and ensuring the longevity of cotto tiles, as it accentuates the inherent clay colour and helps to protect against fading and staining.
The sealant is a solvent based liquid that limits water and oil penetration. It impregnates the tile, protects it and keeps its natural matt aspect.
New Terracotta prefers and recommends the use of water based products, which are more natural and chemically less invasive and are therefore in line with organic products.
- Apply with a brush or a roller on a dry and clean surface.
- Do not apply too much. The excess would leave glistening stains on the surface (brush traces).
- Always try the sealer on a loose tile before applying it on the entire surface in order to measure the grade of absorption of
the tiles.
TILE GROUTING
It is recommended to use a high-grade pre-bagged grouting compound suitable for the application.
Grout joint width can be varied to adjust tile alignment with adjacent tiles or other architectural elements. Grouting General Methods:
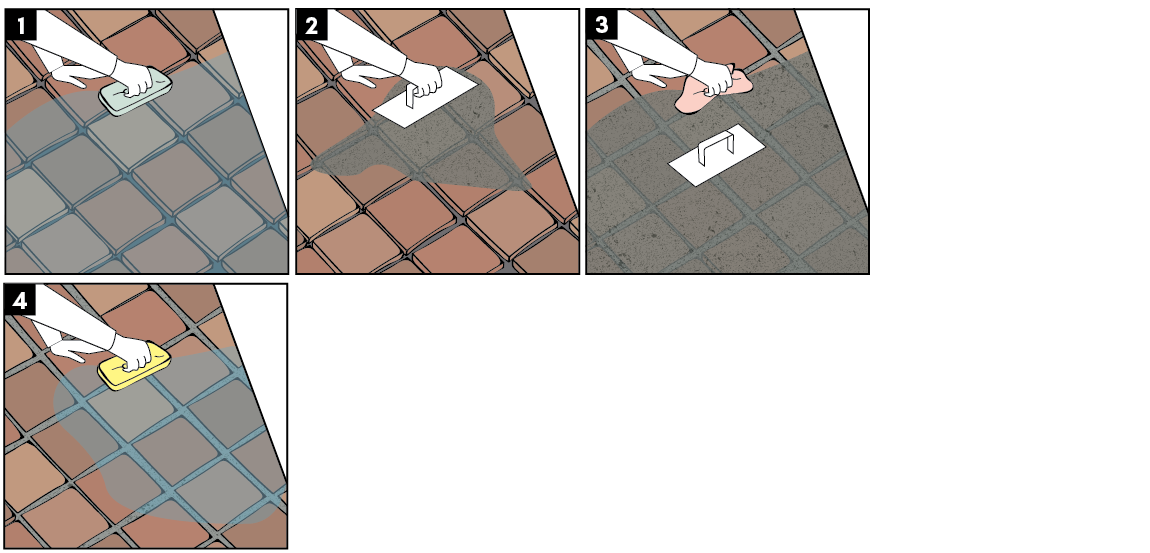
1. Dampen grout joints and tile with a sponge.
2. Grout the joints, ensuring no voids, to the full depth of the paving
tiles.
3. Remove excess grout with a trowel. If any residue remains on the face of the tile a scouring pad or a fine-grained sandpaper can be used to gently remove it.
4. Clean the paving surface with water, ensuring all excess grout has
been removed.
Never use acidic cleaners, strong detergents or bleach as these will damage the tiles. Stains or spots can be delicately removed with a scouring pad or fine-grained sandpaper.
FINISHING AFTER GROUTING
The finishing completes the protection against wear and dirt. It gives the cotto tile the desired final appearance, as it revives the colours of the natural cotto.
Always apply a final coat of impregnating sealant making sure to cover the grout joints as well.
Further to the above you can also apply a surface wax or oil. This will offer extra protection and give an attractive patina.
Mostly used are natural bee waxes either liquid or paste, or specific floor oils. There are various sheens; brilliant gives a shiny appearance, matt keeps the look natural or satin gives a coating between the two.
A finishing wax or oil is not applied on external floors as it would not last long when exposed to weathering. In these situations only a water repellent or oil repellent is applied.
MAINTENANCE
Keep the surface as free as possible of loose dust and grit with regular vacuuming or sweeping. This will reduce the sandpaper effect of dirt getting compacted into the surface and joints.
Wash the floor using a pH neutral cleaner (ideally biodegradable and environment friendly) to remove the dirt that a vacuum won’t pick up and for hygiene purposes.
We strongly recommend avoiding the use of bleach based cleaners, washing-up liquids or any other acid cleaners.
